I love Heart of Texas Studios' Mini Albums. I especially love their acrylic word blooms. It is nice that I happen to know the right people and was able to get them to create me Custom Word Albums for my Grandsons.
Below are Drake and Adler's word blooms. You can click on the CAPTIONS UNDER THE PICTURES to go to Two Peas in a Bucket to see more detail about these albums.
| Drake's Word Bloom |
| Adler's Word Bloom |
 |
| Tate's Word Bloom. |
It took me several months of sporadically working on the album to finish it. Life and other creative projects kept getting in the way. I rediscovered crocheting and have become obsessed with it. I rediscovered sewing and have done a few projects hear and there. I joined the design team for Texana Designs and have enjoyed coming up with unique projects to showcase their rubber stamps. In the meantime, this little album and the adoreable pictures of my third grandson would call my name and inspire me to work on a page. I am trying to wrap up some projects this week so that I can rediscover my love for bridal as I start drafting a pattern for a wedding dress for the daughter of the owner of Texana Designs. I discontinued my fulltime Bridal business once I got my own children married and have been enjoying the life of a full-time Nanny to my grandsons.
I started by edging all the pages with Sharpies. They work great on Acrylic and are easy to control. By coloring the edges I make the letters pop instead of getting lost in what is underneath it.
Another thing I do when working with Acrylic is plan both sides of the page at the same time. If I am using single sided paper, I make sure there is no white showing from the other side. I either glue two pieces of paper together back to back to create a mat that will be adhered to one side of the page and show through the other, or I cut mats and pictures exactly the same size for both sides of the page so that they mirror each other. I also make sure any embellishments I add to the pages that are going to "hang off" the mat are as pretty on the back side as they are on the front.
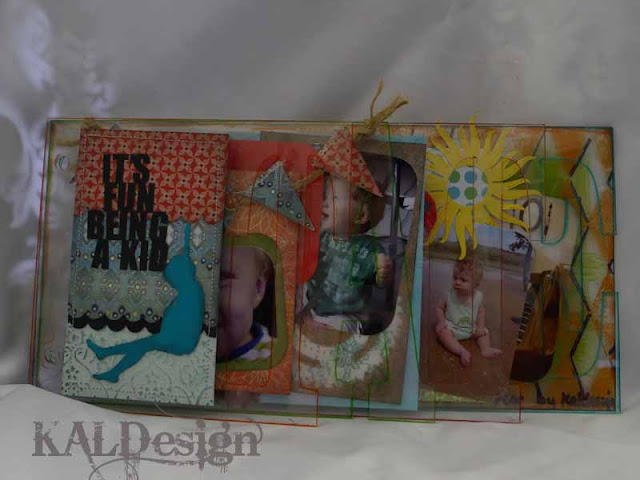
The title page was created using my Silhouette SD for the diecut title and boy. I used my Stampin' Up Scalloped border punch to create the scalloped layers for the mat and the Cuttlebug Textile Textures embossing folder to create the base if the mat. I stitched all the layers together with my sewing machine.
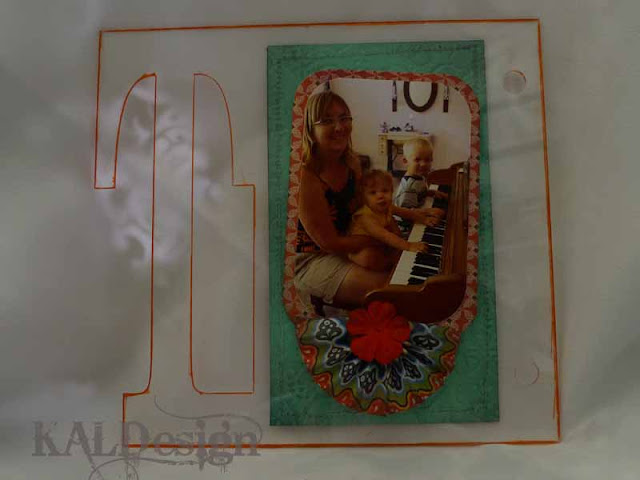
On this side I simply matted a picture and created a half-medallion by pleating a strip of patterned paper and forming the medallion and gluing it to a chipboard circle. I cut it in half and topped it with a Prima paper flower.
On this page I used a double sided paper so the other side showed through to the back of the page. I stitched around the edge of the mat to add a little texture and interest to both sides. I created a little banner out of paper scraps and stitched it to a piece of hemp twine. I made the banner pieces double by cutting them of paper that was folded in half first. The banner was tied to the page using holes I punched with my Cropadile.
On the back side of the A I simply matted my photos with cardstock so that the color showed through to the right side of the page.
The gears embellishments are cut with Spellbinders' dies. I used the big gear as a mask to spray the mat and all the gears with Tattered Angels spray inks.
The picture on the left is backed with the picture on the right on the page below, cut to the exact size.
The embellishments are tiny fabric yoyos with rhinestones in the center. Tiny sheriff's stars are sprinkled around the page to mimic the stars on the yoyo fabric.
The Title, clouds, and the sun diecuts were cut with my Silhouette SD. The clouds were embossed using the Cuttlebug Tiny Bubbles Embossing folder. Both the clouds and the sun were edged with Stickles Glitter glue.
Again the photo on the left is mirrored and backed with the photo on the other side of the page. The bottom of the journaling block is edged with Tim Holtz' Alterations Brackets die.
This final page was the most fun to do. The only paper I used was to make the glitter star and the title.
I painted the piece of acrylic with Adirondak Acrylic Paint Dabber in Lettuce. I then stamped the diamonds using Sunset Orange Acrylic Paint Dabber on a background stamp BG-17 by smARTworks. I then used a black Sharpie to outline the diamonds to add dimension. I sprayed the whole page with a clear coat of UltraGlaze to protect the paint from scratching off.
The back of the Album was left plain so that the paint showed through.
And once again.....The Finished TATE Album.


No comments:
Post a Comment